Wednesday, September 30, 2009

Weekly Square #31

Here is last week’s 6x6” journal square. I won’t go into details, but this square was influenced by needing to keep a diary of my days, and the constant self-surveillance that requires:

zWeek31

I used scraps from the Tattoo quilt I posted about the other day (btw: someone asked why I called it a “Tattoo” quilt, and I realized that I hadn’t bothered to explain that. Some of the fabric is actually based on tattoo designs [see the “mother” above?], and some of it even has things like “Rose’s tattoo shop” printed on it. Since my sweetie loves tattoos, I made that quilt for her).

I FMQed the writing on it; it’s not great work, but it was fun “writing” with thread!

Saturday, September 26, 2009

Tattoo Quilt

I just finished this quilt top from a kit I bought at the Honey Bee Quilt Store a few weeks ago. I justified the purchase when I realized I’m probably going to have to miss the Houston quilt show this year :-(

top

top_closeup

I saw a completed “tattoo” quilt in the store, and thought it was really cute. When I realized there was a kit, I had to snatch it up. This quilt is made from a pattern called “Perfect Ten” by Swirly Girls Design, because it uses 10 fqs. It went together much more quickly than I thought it would.

I need to buy backing fabric for this one, and it may be a while until I have time to FMQ it, but I think it will be adorable!

Wednesday, September 23, 2009

Weekly Square #30

Here is last week’s (9/13-9/19) 6X6” weekly journal square:

zWeek30

And, the bare bones of a new quilt I’ve started:

early_blocks

This one is from a quilt kit I bought at the Honey Bee Quilt Store a few weeks ago. I justified the purchase when I realized I’m probably going to have to miss the Houston quilt show this year :-(

I saw a completed “tattoo” quilt in the store, and thought it was really cute. When I realized there was a kit, I had to snatch it up. This quilt is made from a pattern called “Perfect Ten” by Swirly Girls Design, because it uses 10 fqs. It’s been fairly easy to put together, and I should have the top finished in the next couple of days (depending on how much I energy I have!).

Stay tuned to see the finished quilt!

Saturday, September 19, 2009

Oh Baby!

I finished the crib-size scrap quilt I’ve been working on. Here’s the finished quilt:

leftover_blocks_complete_front
leftover_blocks_complete
leftover_blocks_complete2

No one in the family is expecting a little one right now (pretty unusual for my HUGE family), so I’ll put this one up and save it or else check into donating it to Project Linus.
I used a REALLY cool tip to sew the binding onto this quilt. I saw this on “Sewing with Nancy.” I sewed the folded binding onto the front as usual for a double-fold french binding. Instead of hand-stitching the binding to the back (something I really enjoy doing, but just don’t have time for right now) though, I flipped the binding to the back and machine-stitched it from the FRONT:
binding_front

Using invisible thread, you sew right in the ditch next to the binding (again, on the front). You’ll get a seam on the back that looks like this:

binding_back

And, because this is invisible thread, you can barely see the seam. This is the best solution I’ve found so far for sewing a nice-looking binding by machine.

Friday, September 18, 2009

DOH! Tension Problems

I bought my current sewing machine about 2-1/2 years ago. My old Singer functioned just fine for plain sewing (which I never did, so I hauled it out about once a year to make a repair), but I wanted to be able to FMQ, so after looking at a Husqvarna Viking (and its price tag) and protesting that I didn’t NEED a new machine, my sweetie insisted I buy it.

Ever since, I’ve been really unhappy with the machine, solely because I could never get the tension right. Sometimes it was fine, and other times it was a mess. I’ve spent hours adjusting the upper tension wheel, rethreading the machine, changing out needles, and turning the thread spool in every conceivable direction, all in an effort to get even thread tension. On the best of days, I was able to get stitching that looked like the bottom tension was slightly tight (or the top tension slightly loose).

I had finally decided it was time to take the machine in to have a pro assess the problem. In the meantime, I was going through my usual routine this morning in an effort to get something at least resembling good tension, but all I could manage was this:

tension_problems

Then, as I sat looking at the machine, I had a thought. When I thread it, I’ve always run the thread behind the tension disk or the tension plate or whatever it’s called:

tension_machine copy

But, I thought, what if I ran the thread in front of the disk? I gave it a shot, and here are the results:

tension_problems_after

Wow! Finally, decent tension! I’m a little annoyed that it took me this long to figure this out. I could blame the saleswoman at the sewing machine store, who had me thread the machine to make sure I could do it, but who obviously didn’t realize I wasn’t doing it correctly. I could blame myself for not carefully reading the manual and/or taking it in so someone could figure out that I was threading it wrong. On the bright side, I’m almost as happy as if I had a new machine!

I’m off to FMQ with my “new” machine.

Tuesday, September 15, 2009

Odds and Ends

This is one of those “clean-up” posts; bits and pieces of things I’ve been doing, cool stuff, and WIPs.

A few weeks ago I won a blog giveaway from Lori of Laughing Girl Quilts. This was one awesome giveaway: fqs of Radiance fabric hand-dyed by Lori. And wow, are they gorgeous!

radiance_pfd_dyed

I don’t know a lot about this fabric, but it’s apparently a combination of silk and cotton. One side has a lovely sheen (the silk, I assume), the other a beautiful soft hand. Thanks again, Lori!

Here’s a piece of fabric I dyed a while back. I wasn’t crazy about this piece, and was going to use it for backing an art quilt. I went to iron it, and suddenly I saw a landscape in it, complete with trees and a stream. Can you see it? I think I’m going to experiment thread-painting this piece to enhance the landscape elements:

landscape_dyed

Here’s a piece I’m working on that involves paint, sheers, and FMQ with metallic thread:

heart_sheers

Here’s a small patchwork quilt I’m making from the “leftovers” of the gem quilt:

leftover_blocks_wip

In the centers of the blocks, you can really see the havoc wreaked by my 1/4” quilting foot being so far off. Anyway, it’s nice to use up those leftover blocks and scrap pieces.

And finally, more 6x6” weekly journal squares. The first one is from quite a while back; I wasn’t having much success preparing my own printable fabric, so I had to wait until I could buy some. This square is week 21, July 12-18. Influences: feeling tired, sick, and in pain. Too much heat and loneliness. On the positive side, I did start writing my morning pages again:
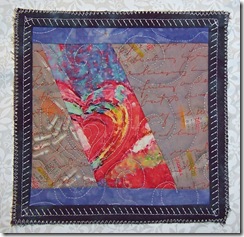
zWeek21

Week #28 was influenced by a new technique—learning to make yo-yos, and by wanting to attract a little more “color” (that is, good things) into my life. The blue braid around the edge represents my blue feelings that week:

zWeek28

Week #29 (last week) was influenced by my need for orderliness (and the clean craft room that brought about), along with relief that we finally got some heavy rains to cool things off and ease the drought (minutely) in Central Texas:

zWeek29

That’s all for now, folks!